
Back to Page
Amazon Photography
Five Actionable Tips To Create Great Amazon Listing Images in 2020
Five Actionable Tips To Create Great Amazon Listing Images in 2020

Back to Page
Amazon Photography
Five Actionable Tips To Create Great Amazon Listing Images in 2020
Jan 13, 2020
They say a picture is worth a thousand words. But in the online world, a picture is worth thousands of dollars of sales. Your listing images can make or break your product. Buyers nowadays won’t even take a closer look at your description or bullet points if they aren’t impressed with your product images.

Product Images Are A Key Factor In Your Conversion Rate

Amazon takes into account the click-through rates and conversion rates to determine the ranking of the product. A product clicked and purchased more frequently will have a higher organic ranking. An improved CTR can be achieved by having a high-quality main image (because keywords-stuffed titles don’t attract the eye of consumers) and a high conversion rate is related to how informative your images are. Don’t believe us? Here are some stats to show how powerful and impactful your product images are:


In this blog post, I will share some valuable tips every Amazon seller can use to optimize their Amazon product infographics and images.
Five Actionable Tips To Get Great Amazon Listing Images In 2020:
Tip #1: The Basic & The Obvious - Follow The Rules
Amazon is all about rules. They have stringent guidelines for everything and product images are no exception. If the images do not adhere to their policies, your product will be stranded and not available for sale. So better be on the SAFER side always.
Here are a few image specifications set by Amazon:
Image size: More than 1000 pixels is a must
Image frame: The product should cover more than 85% of the frame
File format: TIFF (.tif/.tiff), JPEG (.jpeg/.jpg), GIF (.gif), and PNG (.png) are the accepted file formats. Note: At present, Amazon is accepting TIFF files, but in research conducted in 2019, we found that their software has randomly stopped accepting them.
Color mode: sRGB or CMYK are accepted
Max file size you can upload is 10MB
These were the specifications given by Amazon; here are the best practices suggested by the experts:
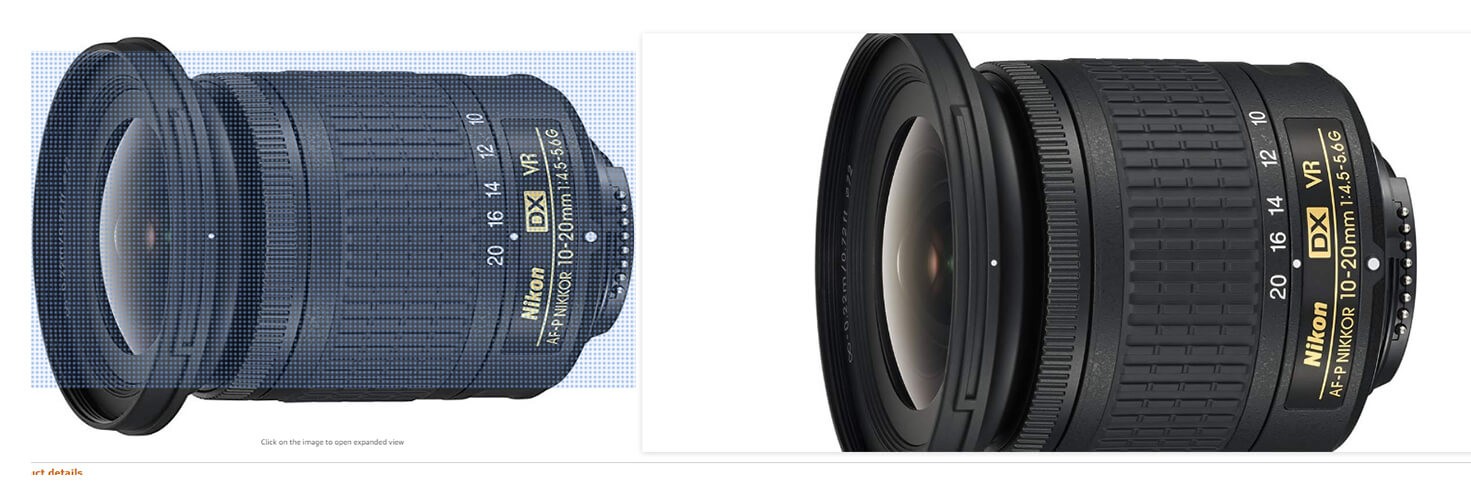
Your image should be of 2000 x 2000 pixels to enable hover to zoom option
The image should be cropped tightly, so there is minimum white space
Save it as a JPEG image with 100% compression because Amazon will compress it again while uploading
Save it as sRGB color space
Tip #2: Use High-Resolution Images Or Stop Selling
Do I even need to say this? High-quality images are a prerequisite for selling online. Would you buy a product online if the images are blurry? Coz’ I won’t; no one won’t.
Nothing turns off a buyer more than a product detail page with low-quality images. More often than not, a customer’s first impression of a poor quality image equals an inferior quality product. A shopper won’t buy your product even if you have the best price or great discounts because he won’t consider you as a trustworthy seller. Whether it’s your main image, infographics, lifestyles, or any other image, it should be high resolution. It’s worth investing your dollars in getting your product professionally clicked and edited by professional Amazon infographic services like eStore Factory. So never miss this step.
Tip #3: Main Image Should Go Beyond Just Clipping The Background
There is a reason the primary image of your product listing is called the “Main” or “Hero” image because it’s the first thing a customer will see. Not just on your listing page, the main image of your product is shown in the search results, advertising banners, and many other places you may not have realized. So it’s worth investing your time and money to make it look the best.
Most Amazon sellers will create the main image by just clipping the background, but your efforts should go much beyond that. Even if your photo is clicked with the latest camera in a state-of-the-art studio by a professional photographer, it will have flaws. Such photography flaws should be removed by retouching.
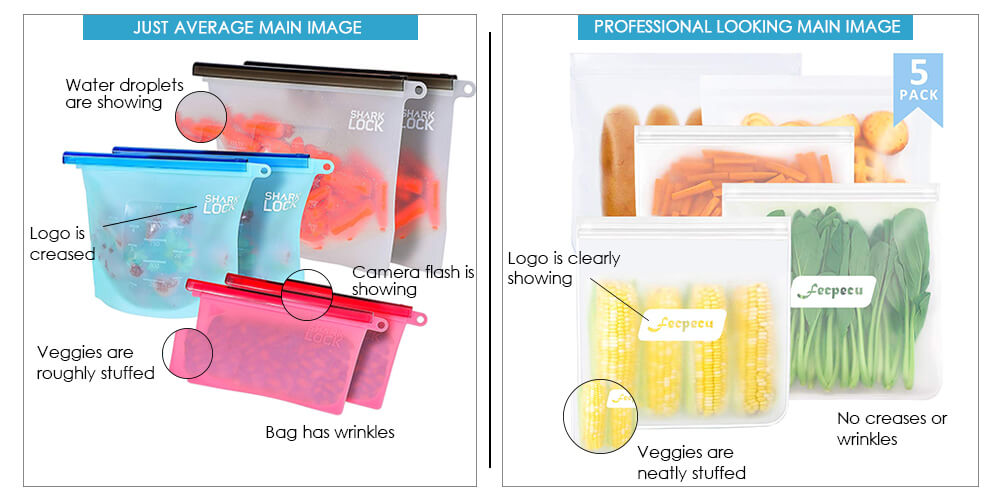
Take a look at the images on the left, there are wrinkles on the food storage bags, water droplets are showing, vegetables are roughly stuffed into the bag, the brand name is not visible and there is a camera flash on the zipper. Now, these might look very minute mistakes, but together they ruin the look of your product. On the right side, there are no wrinkles on the bag, the food is neatly placed and the image looks just so perfect and clean. It’s up to you to decide how you want your product’s first impression to be – professional or just average.
Tip #4: Never Settle For Less
When Amazon gives you nine slots for images, make sure you make each one count. Don’t just upload 2 or 3 simple images when you can wow customers by creating 9 enticing images. Uploading as many images as possible helps online sellers overcome one huge disadvantage: not being able to put products in the hands of the customer.
We have listed the types of images every Amazon seller can and should have on their listing:
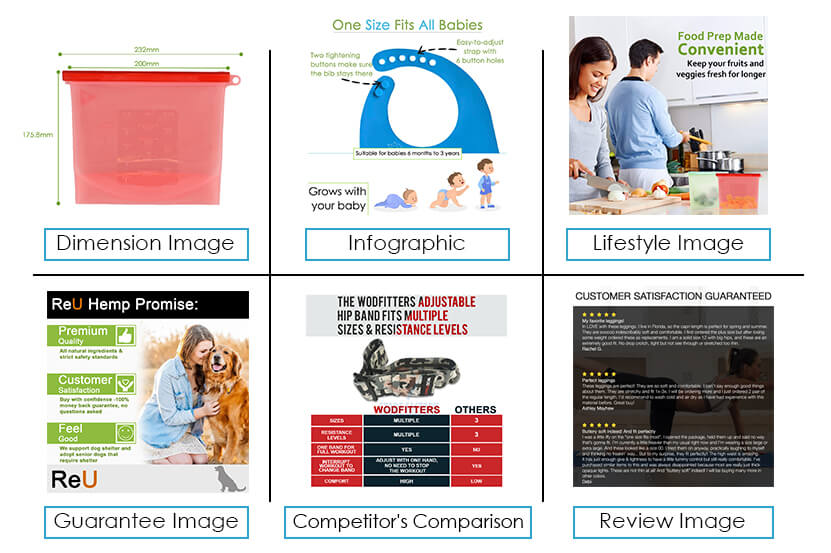
Infographic images: These images can be of great use to highlight the standout features of the product. So even if the buyer does not bother to read the copy, he will be aware of the features and benefits.
Lifestyle images: Showing pictures of your product in everyday situations will help the buyer visualize what it would be like to own the product and they can be more confident about their buying decision.
Images showing different angles of the product: This helps the customer feel that they have seen the whole product.
Dimension image: It helps the buyer understand the size of the product so they can determine if it’s suitable for them or not.
Instruction image: It’s a great way to proactively prevent negative reviews.Competitor comparison chart: A comparison chart will save buyers time browsing through multiple products to make a purchasing decision.
Review image: This image works as solid proof that your product is trustworthy and it also increases the buyer’s confidence.
Product videos are also highly recommended. It allows the customer to see the product in action and it builds a great impression of your product in a way that static images cannot.
New Update: Amazon recently introduced a 360 Spin, which enables sellers to upload images that show a 360-degree view of the product. Not surprisingly, sellers utilizing this feature have shown a 6-8% increase in their conversion rates.
Tip #5: Set Your Priorities Straight
Once your photos are ready, you will want to prioritize the sequence in which the images will appear on the detail page. The order of the images might not look that important, but in reality, it affects a customer’s buying experience. Amazon’s platform gives you the ability to place your images in a specific order, which is an excellent opportunity to present your product images in a logical order.
For example, if you are selling a handbag, you should set the front of the handbag as the main image, the back and side view as the second and third images, and then proceed with an inside view image. Makes sense, doesn’t it?
Here is the image order you can follow for the 9 image slots:
Main image
An infographic showing product features/benefits
An infographic showing the size of the product
Lifestyle image
Lifestyle image
An infographic showing available colors/sizes
Competitor comparison chart image
Customer review image
Guarantee/warrant image
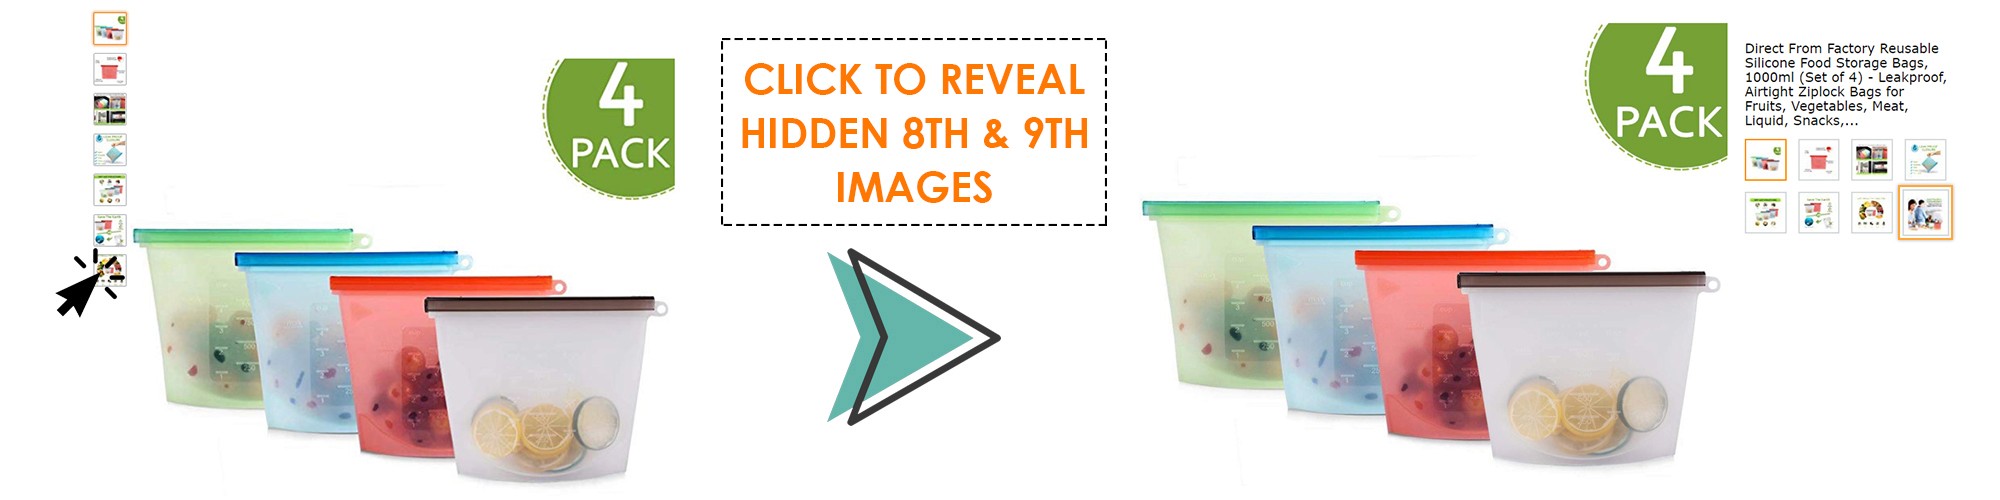
Out of the 9 slots, only 7 slots will be visible on the live page, the 8th and 9th images will be hidden unless the customer clicks on the image gallery. Therefore you must place the most important seven images first because it may be possible that the customer is never able to view the 8th and 9th images.
While uploading the images and infographics for Amazon listing, don’t forget to name them properly. It’s a good SEO practice and Amazon recommends it too. Name your file name with a unique identifier and a qualitative, short keyword. E.g., B00125YFDT – Kitchen Blender.jpeg. This will make it easy for the crawlers to index your images in Amazon’s algorithm.
Bonus Tip: Hire Amazon Experts
No one said that creating professional images is easy. But you don’t have to do it all alone. eStore Factory is your one-stop shop to create and optimize listing images for your product. With the experience of designing more than 500 infographics and lifestyle images for Amazon sellers, we know what’s right for your product. Contact Us now and make your product images better, more effective, and eye-catching.
They say a picture is worth a thousand words. But in the online world, a picture is worth thousands of dollars of sales. Your listing images can make or break your product. Buyers nowadays won’t even take a closer look at your description or bullet points if they aren’t impressed with your product images.
Product Images Are A Key Factor In Your Conversion Rate
Amazon takes into account the click-through rates and conversion rates to determine the ranking of the product. A product clicked and purchased more frequently will have a higher organic ranking. An improved CTR can be achieved by having a high-quality main image (because keywords-stuffed titles don’t attract the eye of consumers) and a high conversion rate is related to how informative your images are. Don’t believe us? Here are some stats to show how powerful and impactful your product images are:
In this blog post, I will share some valuable tips every Amazon seller can use to optimize their Amazon product infographics and images.
Five Actionable Tips To Get Great Amazon Listing Images In 2020:
Tip #1: The Basic & The Obvious - Follow The Rules
Amazon is all about rules. They have stringent guidelines for everything and product images are no exception. If the images do not adhere to their policies, your product will be stranded and not available for sale. So better be on the SAFER side always.
Here are a few image specifications set by Amazon:
Image size: More than 1000 pixels is a must
Image frame: The product should cover more than 85% of the frame
File format: TIFF (.tif/.tiff), JPEG (.jpeg/.jpg), GIF (.gif), and PNG (.png) are the accepted file formats. Note: At present, Amazon is accepting TIFF files, but in research conducted in 2019, we found that their software has randomly stopped accepting them.
Color mode: sRGB or CMYK are accepted
Max file size you can upload is 10MB
These were the specifications given by Amazon; here are the best practices suggested by the experts:
Your image should be of 2000 x 2000 pixels to enable hover to zoom option
The image should be cropped tightly, so there is minimum white space
Save it as a JPEG image with 100% compression because Amazon will compress it again while uploading
Save it as sRGB color space
Tip #2: Use High-Resolution Images Or Stop Selling
Do I even need to say this? High-quality images are a prerequisite for selling online. Would you buy a product online if the images are blurry? Coz’ I won’t; no one won’t.
Nothing turns off a buyer more than a product detail page with low-quality images. More often than not, a customer’s first impression of a poor quality image equals an inferior quality product. A shopper won’t buy your product even if you have the best price or great discounts because he won’t consider you as a trustworthy seller. Whether it’s your main image, infographics, lifestyles, or any other image, it should be high resolution. It’s worth investing your dollars in getting your product professionally clicked and edited by professional Amazon infographic services like eStore Factory. So never miss this step.
Tip #3: Main Image Should Go Beyond Just Clipping The Background
There is a reason the primary image of your product listing is called the “Main” or “Hero” image because it’s the first thing a customer will see. Not just on your listing page, the main image of your product is shown in the search results, advertising banners, and many other places you may not have realized. So it’s worth investing your time and money to make it look the best.
Most Amazon sellers will create the main image by just clipping the background, but your efforts should go much beyond that. Even if your photo is clicked with the latest camera in a state-of-the-art studio by a professional photographer, it will have flaws. Such photography flaws should be removed by retouching.
Take a look at the images on the left, there are wrinkles on the food storage bags, water droplets are showing, vegetables are roughly stuffed into the bag, the brand name is not visible and there is a camera flash on the zipper. Now, these might look very minute mistakes, but together they ruin the look of your product. On the right side, there are no wrinkles on the bag, the food is neatly placed and the image looks just so perfect and clean. It’s up to you to decide how you want your product’s first impression to be – professional or just average.
Tip #4: Never Settle For Less
When Amazon gives you nine slots for images, make sure you make each one count. Don’t just upload 2 or 3 simple images when you can wow customers by creating 9 enticing images. Uploading as many images as possible helps online sellers overcome one huge disadvantage: not being able to put products in the hands of the customer.
We have listed the types of images every Amazon seller can and should have on their listing:
Infographic images: These images can be of great use to highlight the standout features of the product. So even if the buyer does not bother to read the copy, he will be aware of the features and benefits.
Lifestyle images: Showing pictures of your product in everyday situations will help the buyer visualize what it would be like to own the product and they can be more confident about their buying decision.
Images showing different angles of the product: This helps the customer feel that they have seen the whole product.
Dimension image: It helps the buyer understand the size of the product so they can determine if it’s suitable for them or not.
Instruction image: It’s a great way to proactively prevent negative reviews.Competitor comparison chart: A comparison chart will save buyers time browsing through multiple products to make a purchasing decision.
Review image: This image works as solid proof that your product is trustworthy and it also increases the buyer’s confidence.
Product videos are also highly recommended. It allows the customer to see the product in action and it builds a great impression of your product in a way that static images cannot.
New Update: Amazon recently introduced a 360 Spin, which enables sellers to upload images that show a 360-degree view of the product. Not surprisingly, sellers utilizing this feature have shown a 6-8% increase in their conversion rates.
Tip #5: Set Your Priorities Straight
Once your photos are ready, you will want to prioritize the sequence in which the images will appear on the detail page. The order of the images might not look that important, but in reality, it affects a customer’s buying experience. Amazon’s platform gives you the ability to place your images in a specific order, which is an excellent opportunity to present your product images in a logical order.
For example, if you are selling a handbag, you should set the front of the handbag as the main image, the back and side view as the second and third images, and then proceed with an inside view image. Makes sense, doesn’t it?
Here is the image order you can follow for the 9 image slots:
Main image
An infographic showing product features/benefits
An infographic showing the size of the product
Lifestyle image
Lifestyle image
An infographic showing available colors/sizes
Competitor comparison chart image
Customer review image
Guarantee/warrant image
Out of the 9 slots, only 7 slots will be visible on the live page, the 8th and 9th images will be hidden unless the customer clicks on the image gallery. Therefore you must place the most important seven images first because it may be possible that the customer is never able to view the 8th and 9th images.
While uploading the images and infographics for Amazon listing, don’t forget to name them properly. It’s a good SEO practice and Amazon recommends it too. Name your file name with a unique identifier and a qualitative, short keyword. E.g., B00125YFDT – Kitchen Blender.jpeg. This will make it easy for the crawlers to index your images in Amazon’s algorithm.
Bonus Tip: Hire Amazon Experts
No one said that creating professional images is easy. But you don’t have to do it all alone. eStore Factory is your one-stop shop to create and optimize listing images for your product. With the experience of designing more than 500 infographics and lifestyle images for Amazon sellers, we know what’s right for your product. Contact Us now and make your product images better, more effective, and eye-catching.


eStore Factory is a full-service Amazon agency dedicated to building end-to-end strategies for brands of all sizes.


SERVICES FOR AMAZON
Product Setup ON AMAZON
GRAPHICS & BRANDING SERVICES
© Copyright 2014 - 2025. All Rights Reserved.
eStore Factory is a full-service Amazon agency dedicated to building end-to-end strategies for brands of all sizes.
SERVICES FOR AMAZON
Product Setup ON AMAZON
GRAPHICS & BRANDING SERVICES
© Copyright 2014 - 2025. All Rights Reserved.
eStore Factory is a full-service Amazon agency dedicated to building end-to-end strategies for brands of all sizes.
SERVICES FOR AMAZON
Product Setup ON AMAZON
GRAPHICS & BRANDING SERVICES
© Copyright 2014 - 2025. All Rights Reserved.