Back to Page
Amazon
Set Up Your Campaign The Right Way In Just 7 Simple Steps (S1:E4)
Set Up Your Campaign The Right Way In Just 7 Simple Steps (S1:E4)

Back to Page
Amazon
Set Up Your Campaign The Right Way In Just 7 Simple Steps (S1:E4)

Amazon Sponsored Ads Series: Episode 4
So far in the previous two episodes of the Amazon Sponsored Ad series, you have learned about the sponsored ad types and the targeting method available. Now we are all set to create campaigns. But it’s not just about throwing products into the campaigns, hoping that it will run. Poorly constructed campaigns can cause increased ACOS and negative conversion rates. Think of Amazon PPC campaigns as a building, creating a campaign will be the foundation, and it should be very strong so you can continue building. We have created this step-by-step guide which will help you build the most effective and optimized campaigns.
Step #1: Deciding the Campaign Objective – Why Are You Running This Campaign?
This is the first and most crucial step. Before setting up a campaign, you must be mindful of what is the objective. Your campaign objective will impact many of the decisions you make while setting up the campaign. Most of the advertisers run Sponsored Ads for:
(a) Campaign Efficiency:
Campaign efficiency is measured by ACOS and ROAS.
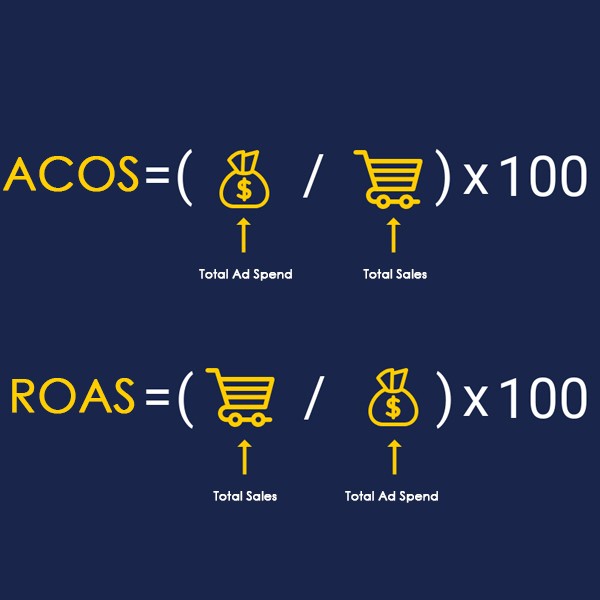
Advertising Cost Of Sales (ACOS) is the total amount spent on the campaign divided by total sales. The lower the ACOS, the more efficient your campaign is. Low ACOS indicates that the sales are high, and the advertising cost (spend) is low. So, you are getting more profits.
Return On Advertising Spend (ROAS) is the total sales of your campaign divided by what you have spent on advertising. ROAS is the opposite of ACOS. So, the higher the ROAS, the more efficient your campaign is.
(b) Brand Awareness:

Brand awareness is measured by impressions. Impressions mean how many times your ad is shown to shoppers.
Step #2: Selecting ASINs to Advertise – Best Performing and Potentially Strong
Choosing the right ASINs will increase your chances of reaching the campaign goal. You can select the ASINs based on their performance as well as your campaign objective.
(a) Choosing ASINs Based On Performance:
Regardless of your campaign objective, choose the ASINs that are already high-selling. By capitalizing on the best-selling products, you are maintaining relevancy with CTR and sales. As you will get more impressions, clicks, and eventually sales, you will be successful in defending your digital shelf while you prepare to advertise other strong and low-performing ASINs. Along with best-selling ASINs, start to advertise on the strong ASINs. Review your whole product catalog and choose the products that pass the retail readiness checklist. Don’t know what that is? Click on the link below to get all the information.
Advertising on these ASINs will help you to increase brand awareness and sales across the whole line of products.
(b) Choosing ASINs Based On Campaign Objective:
If your objective is to improve campaign efficiency (measured by ACOS and ROAS), you should avoid advertising any products that have low sales or that do not meet the retail readiness guidelines. These ASINs will just increase your spending, ACOS, and will not contribute towards improving your campaign efficiency. However, if your campaign objective is to drive brand awareness (measured by impressions), then consider advertising products that have low sales or products that are recently launched.
Tip: Do not choose any ASINs which are not retail-ready.
Step #3: Selecting the Sponsored Ad Types – Increase Visibility or Traffic
In episode 2 of the Amazon Sponsored Ad series, we discussed the types of Sponsored Advertising Amazon offers. Sellers can choose either of both. The question is when to choose which.
It is recommended that your advertising campaigns contain a mix of both to ensure that you get the most from your product offerings. But depending on the product, you are advertising and the objective, sellers can choose any of them.
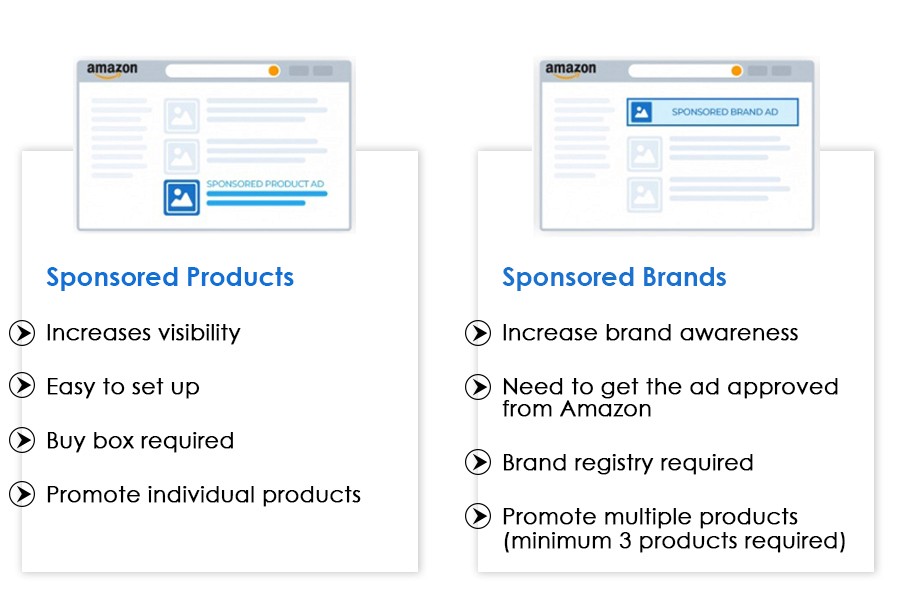
(a) Sponsored Products – Increase Visibility
The main objective of a sponsored product ad is to increase visibility. These ads have highly visible placement across the search result pages as well as product detail pages. The best part is that they appear along with the organic results and sometimes even above the organic results. Advertisers can use these ads to promote the listing to shoppers who are searching for a product similar to theirs. Sponsored product ads are simple to set up, they do not require any images or copy, and they go live within an hour. This means that you can start getting impressions within an hour.
(b) Sponsored Brands – Increase Brand Awareness (Brand Registry required)
Sponsored Brand Ads work great for increasing brand awareness and impression for a brand’s entire product catalog or a new line of products. These ads stretch across the top of the product detail page, and the landing page of the ad can be your product detail page or your brand store. Because they drive traffic to your brand store, they create an immersive and engaging shopping experience for the customers. Sellers need to create an engaging headline and will have to choose the image that will be displayed on the left side of the ad. Using the brand logo will be effective for brand building, and it will motivate customers to click on the ad.
Step #4: Set the Budget & Duration – Financial Thresholds
The next step is to decide on the budget. Setting a budget will help you to keep a check on your advertising dollars. Advertisers can control spend by setting a daily budget and if they are using Sponsored Brand ads, a campaign budget.
(a) Daily Budget: It means the maximum amount you are willing to spend per day over a calendar month. When your daily budget runs out, your campaign will pause automatically. It’s essential to set an adequate budget so your campaign can run throughout the day. You can increase or decrease the budget anytime. Example: An advertiser has a campaign for its best-selling products. To ensure that their ads run daily and throughout the day, they use daily budgets.
(b) Campaign Budget (Sponsored Brands Only): It means the maximum amount you are willing to spend for an entire campaign. Your campaign will continue to run until the budget is consumed or the campaign expires. The campaign budget applies to Sponsored Brand Ads only. When using the campaign budget, sellers should only select an end date. After they have chosen the campaign budget, they can either increase or decrease it.
Example: An advertiser is running a Black Friday campaign, and they have a limited budget. They use a campaign budget to make sure they do not spend more than their goal.
Also, depending on your campaign objective, you can decide the duration of your campaign. You can either run your campaign continuously or seasonally for a limited time.
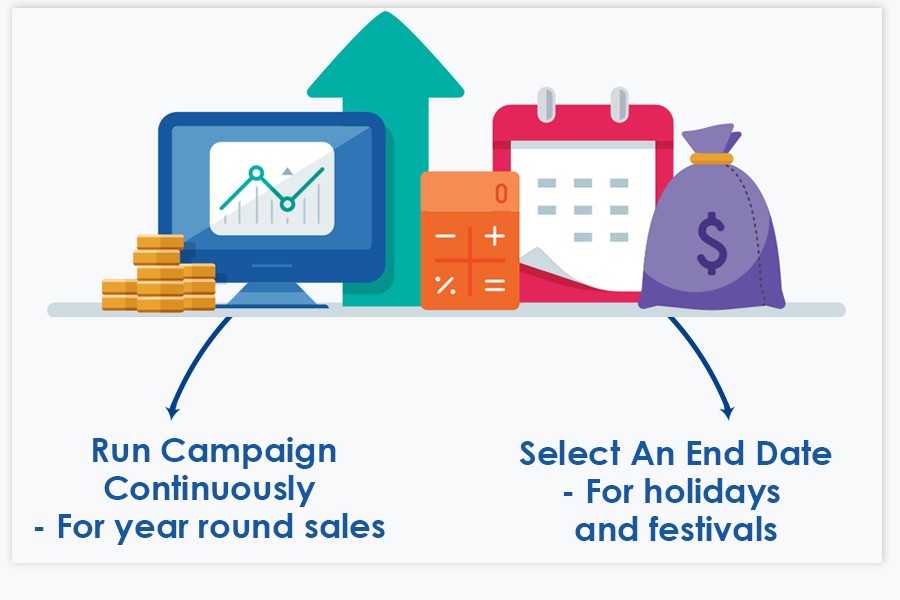
(a) Run Campaign Continuously: If you want to run the campaigns year-round and don’t want to miss out on any impressions or sales, then you should not enter an end date. Example: An advertiser is running a campaign for its best-selling products. He does not want to miss out on any chances of getting sales, so he decides to run the campaign continuously all year round.
(b) Select An End Date: Selecting an end date can prove to be effective when you are running seasonal campaigns or campaigns for some upcoming holidays and festivals, or you are advertising products with limited availability. When the end date has passed, your campaign will automatically expire. You can extend the end date any time before the campaign expires. If the campaign expires and you still want to run it, you can copy it and start a new campaign.
Example: An Advertiser is running a campaign for Prime Day. He launches the campaign a few days before Prime Day and chooses an end date at the end of the Prime Day.
Step #5: Adding Keywords And Targeting Products And Category – Reach The Right Audience:
Based on the type of advertising, you can choose the targeting methods. Sellers can either target by keywords, products, or categories (Category and product targeting are only available for Sponsored Products and not for Sponsored Ads). If you choose to target by keywords, there are various strategies to consider. It’s very essential to have your keyword list, and it is equally important to consider how shoppers search for a product (customer search terms) because the customer may search on Amazon using different search terms that you are not even aware of. So it’s best to have a range of relevant keywords ready before you start your campaign. There are two categories of keywords – brand and category.
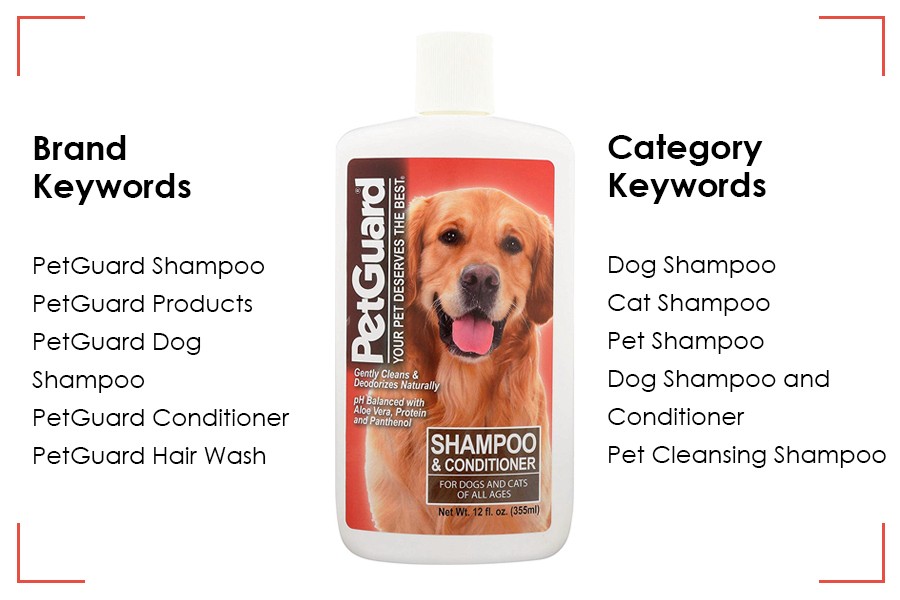
(a) Brand Keywords: It is for customers who are searching for your brand. Adding such keywords in your campaign will make it easy for them to find your ad in Amazon search results. These keywords will have a high conversion rate, and they will also help you maintain your position on the digital shelf. One disadvantage of brand keywords is that they might have a low volume, which can mean low impressions. Example: August is a beverage company that sells energy drinks. To appear for their brand, they target keywords like “August Energy Drink,” “August Sports Drink” etc.
(b) Category Keywords: Category keywords help the seller reach the customers who are searching for general products that are similar to their product. In category keywords, you get a larger volume of searches, more impressions, and more sales. But there are chances of high ACOS and low ROAS. Example: August wants to appear for searches that are not necessarily related to their brand. So they bid on keywords like “sports drink,” “fitness drink,” and “energy drink.”
We recommend using a mix of product, category, and keyword targeting for maximum searchability, visibility, and detail page coverage. Sellers can use the keyword and product targeting in the same campaign but not in the same ad group. Vendors can only use one targeting type per campaign.
Step #6 Setting the Bid – The Straightforward Approach:
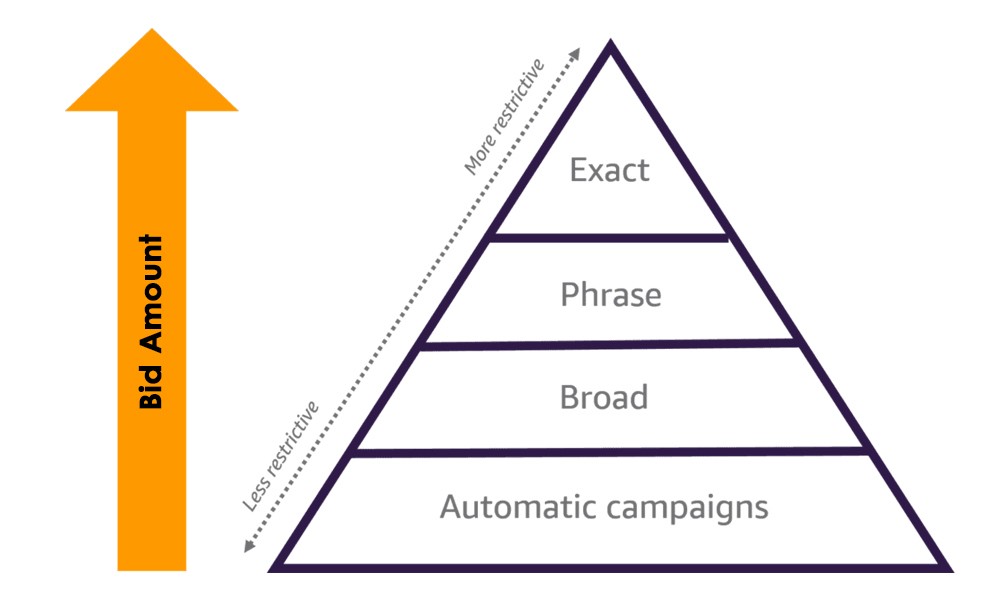
The next thing you do is to set a bid for your keywords. A bid is the maximum amount you are willing to spend on a click. You can always scale your bids at a later time. Depending on the keywords and keyword match type, you have to bid differently. With increasing competition, the bid also increases.
Setting Bids by Match Type:
Setting Bids by Keywords:
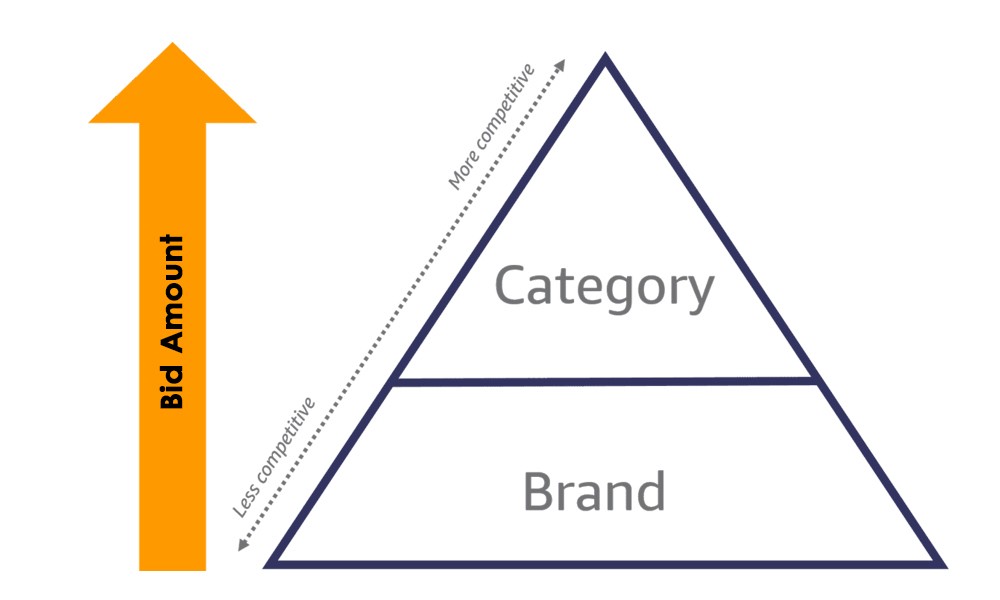
The more restrictive your keyword or match type is, the higher you bid on it. You can set bids for your automatic campaign at $0.35. For broad match and brand keywords, you can increase the bid by approximately 40 to 50 percent, which is $0.60. For phrase and category keywords, you can set the bids about 20 to 25 percent higher than broad and brand keywords, which is $0.75. For the most restricted and less competitive category, the bid will be 35 percent higher than phrase and category keywords, which is $1.00.
(a) Bidding Strategies for Sponsored Product Ads:
In an automatic campaign, you set bids for the whole campaign, and in manual campaigns, you can set bid on individual keywords. Sellers can choose from three bidding strategies and determine which one works best for their campaign.
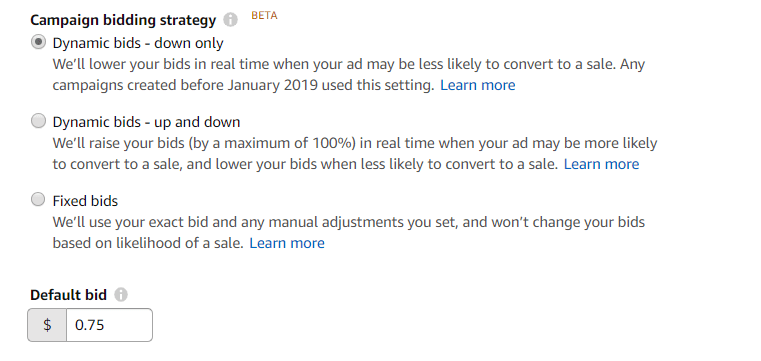
Dynamic Bid – Down Only: Amazon will decrease the bid in real time if your ad is less likely to convert into a sale. Amazon may decrease the bid by 100%.
Dynamic Bid – Up and Down: Amazon adjusts your bid in real if your ad is more likely to convert and it will lower the bid if your ad is less likely to convert to a sale.
Fixed Bid (The traditional method): Amazon will use the exact for all opportunities. You will get more impressions compared to dynamic bidding, but the chances of conversion will decrease.
Adjusting bids by placement:
In addition to creating a bidding strategy, you can differentiate bids by placement. Placement means the places across Amazon where your ad can appear. Sellers can adjust the bid by placement to increase the visibility of an ad for a specific placement. You can enter a percentage increase (up to 900%) to your base bids for the two placements – the top of the search page and product pages. By doing this, your bid will be increased by a specific amount when your ad competes for an opportunity on those placements. Your base bid will apply to the “rest of the search.”

At present, there are three placement groups:
The top of the search – your ad will appear at the top row on the first page of search results.
Rest of the Search – your ad will appear in the middle or at the bottom of the search result. It also appears on the second page and beyond.
Product Page – your ad will appear on the product detail page and other off search results like the add-to-cart page.
How it works:
Suppose you are advertising a watch and your bid is $1.00 for a sports watch. You set a 50% and 25% adjustment for ‘top of search (first page)’ and ‘product pages.’ This is how your bids will be applied:
(b) Bidding Strategy for Sponsored Brand Ads:
Sponsored Brands has a feature called automated bidding where Amazon automatically adjusts the bid across all the placements. For instance, automated bidding will lower the bidding for placements below the top search. Automated bidding will never increase the bids. Sellers can also choose custom bidding to increase or decrease the bid for other placements. This adjustment will be used for placement below the top of the search.
Step #7: Set Up & Manage the Campaigns – Time to Go Live
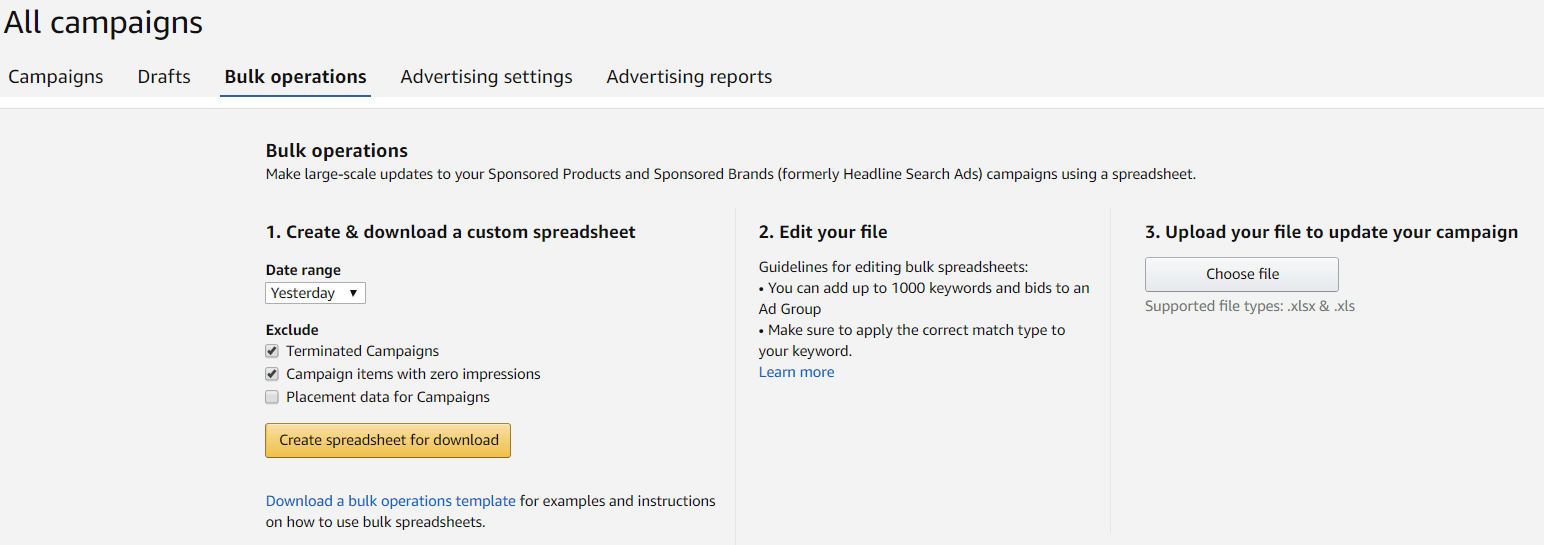
You can either create a campaign manually or by bulk operation. Bulk operation also allows you to manage, edit, and optimize the campaign from time to time. You can use the bulk operation to do the following:
Pausing the campaign
Changing the end date
Updating the daily budget
Adding new products in a campaign
Adding new keywords in a campaign
Pausing existing keywords
Scaling the keyword bids
Things To Remember:
Advertise products based on objective (increase visibility or brand awareness) and based on that choose your advertising type (Sponsored Products or Sponsored Brands)
Start with an automatic campaign and then move to manual campaigns
Run both automatic and manual campaigns to stay updated on the trend of keywords
Conduct proper keyword research before starting campaigns
Target by keywords and products
Save time by managing a campaign with bulk upload
Don’t just sit and watch – try new strategies every day
That’s all folks. Setting up the campaigns the right way will prevent you from any headaches of redoing them in the future. Now that you have built a robust frame for your advertising campaigns let them run and increase your sales. But remember they are not a set-it-and-forget-it thing. You need to continuously optimize them at a micro level to make sure you are receiving the right amount of visibility and traffic on your product detail page. If you need any help with Amazon PPC management, contact us.
Wait For The Next Part:
In episode five, we will learn how to optimize your ads through ad reports, and you can measure and improve campaign performance as well as identify growth opportunities.
Amazon Sponsored Ads Series: Episode 4
So far in the previous two episodes of the Amazon Sponsored Ad series, you have learned about the sponsored ad types and the targeting method available. Now we are all set to create campaigns. But it’s not just about throwing products into the campaigns, hoping that it will run. Poorly constructed campaigns can cause increased ACOS and negative conversion rates. Think of Amazon PPC campaigns as a building, creating a campaign will be the foundation, and it should be very strong so you can continue building. We have created this step-by-step guide which will help you build the most effective and optimized campaigns.
Step #1: Deciding the Campaign Objective – Why Are You Running This Campaign?
This is the first and most crucial step. Before setting up a campaign, you must be mindful of what is the objective. Your campaign objective will impact many of the decisions you make while setting up the campaign. Most of the advertisers run Sponsored Ads for:
(a) Campaign Efficiency:
Campaign efficiency is measured by ACOS and ROAS.

Advertising Cost Of Sales (ACOS) is the total amount spent on the campaign divided by total sales. The lower the ACOS, the more efficient your campaign is. Low ACOS indicates that the sales are high, and the advertising cost (spend) is low. So, you are getting more profits.
Return On Advertising Spend (ROAS) is the total sales of your campaign divided by what you have spent on advertising. ROAS is the opposite of ACOS. So, the higher the ROAS, the more efficient your campaign is.
(b) Brand Awareness:

Brand awareness is measured by impressions. Impressions mean how many times your ad is shown to shoppers.
Step #2: Selecting ASINs to Advertise – Best Performing and Potentially Strong
Choosing the right ASINs will increase your chances of reaching the campaign goal. You can select the ASINs based on their performance as well as your campaign objective.
(a) Choosing ASINs Based On Performance:
Regardless of your campaign objective, choose the ASINs that are already high-selling. By capitalizing on the best-selling products, you are maintaining relevancy with CTR and sales. As you will get more impressions, clicks, and eventually sales, you will be successful in defending your digital shelf while you prepare to advertise other strong and low-performing ASINs. Along with best-selling ASINs, start to advertise on the strong ASINs. Review your whole product catalog and choose the products that pass the retail readiness checklist. Don’t know what that is? Click on the link below to get all the information.
Advertising on these ASINs will help you to increase brand awareness and sales across the whole line of products.
(b) Choosing ASINs Based On Campaign Objective:
If your objective is to improve campaign efficiency (measured by ACOS and ROAS), you should avoid advertising any products that have low sales or that do not meet the retail readiness guidelines. These ASINs will just increase your spending, ACOS, and will not contribute towards improving your campaign efficiency. However, if your campaign objective is to drive brand awareness (measured by impressions), then consider advertising products that have low sales or products that are recently launched.
Tip: Do not choose any ASINs which are not retail-ready.
Step #3: Selecting the Sponsored Ad Types – Increase Visibility or Traffic
In episode 2 of the Amazon Sponsored Ad series, we discussed the types of Sponsored Advertising Amazon offers. Sellers can choose either of both. The question is when to choose which.
It is recommended that your advertising campaigns contain a mix of both to ensure that you get the most from your product offerings. But depending on the product, you are advertising and the objective, sellers can choose any of them.

(a) Sponsored Products – Increase Visibility
The main objective of a sponsored product ad is to increase visibility. These ads have highly visible placement across the search result pages as well as product detail pages. The best part is that they appear along with the organic results and sometimes even above the organic results. Advertisers can use these ads to promote the listing to shoppers who are searching for a product similar to theirs. Sponsored product ads are simple to set up, they do not require any images or copy, and they go live within an hour. This means that you can start getting impressions within an hour.
(b) Sponsored Brands – Increase Brand Awareness (Brand Registry required)
Sponsored Brand Ads work great for increasing brand awareness and impression for a brand’s entire product catalog or a new line of products. These ads stretch across the top of the product detail page, and the landing page of the ad can be your product detail page or your brand store. Because they drive traffic to your brand store, they create an immersive and engaging shopping experience for the customers. Sellers need to create an engaging headline and will have to choose the image that will be displayed on the left side of the ad. Using the brand logo will be effective for brand building, and it will motivate customers to click on the ad.
Step #4: Set the Budget & Duration – Financial Thresholds
The next step is to decide on the budget. Setting a budget will help you to keep a check on your advertising dollars. Advertisers can control spend by setting a daily budget and if they are using Sponsored Brand ads, a campaign budget.
(a) Daily Budget: It means the maximum amount you are willing to spend per day over a calendar month. When your daily budget runs out, your campaign will pause automatically. It’s essential to set an adequate budget so your campaign can run throughout the day. You can increase or decrease the budget anytime. Example: An advertiser has a campaign for its best-selling products. To ensure that their ads run daily and throughout the day, they use daily budgets.
(b) Campaign Budget (Sponsored Brands Only): It means the maximum amount you are willing to spend for an entire campaign. Your campaign will continue to run until the budget is consumed or the campaign expires. The campaign budget applies to Sponsored Brand Ads only. When using the campaign budget, sellers should only select an end date. After they have chosen the campaign budget, they can either increase or decrease it.
Example: An advertiser is running a Black Friday campaign, and they have a limited budget. They use a campaign budget to make sure they do not spend more than their goal.
Also, depending on your campaign objective, you can decide the duration of your campaign. You can either run your campaign continuously or seasonally for a limited time.

(a) Run Campaign Continuously: If you want to run the campaigns year-round and don’t want to miss out on any impressions or sales, then you should not enter an end date. Example: An advertiser is running a campaign for its best-selling products. He does not want to miss out on any chances of getting sales, so he decides to run the campaign continuously all year round.
(b) Select An End Date: Selecting an end date can prove to be effective when you are running seasonal campaigns or campaigns for some upcoming holidays and festivals, or you are advertising products with limited availability. When the end date has passed, your campaign will automatically expire. You can extend the end date any time before the campaign expires. If the campaign expires and you still want to run it, you can copy it and start a new campaign.
Example: An Advertiser is running a campaign for Prime Day. He launches the campaign a few days before Prime Day and chooses an end date at the end of the Prime Day.
Step #5: Adding Keywords And Targeting Products And Category – Reach The Right Audience:
Based on the type of advertising, you can choose the targeting methods. Sellers can either target by keywords, products, or categories (Category and product targeting are only available for Sponsored Products and not for Sponsored Ads). If you choose to target by keywords, there are various strategies to consider. It’s very essential to have your keyword list, and it is equally important to consider how shoppers search for a product (customer search terms) because the customer may search on Amazon using different search terms that you are not even aware of. So it’s best to have a range of relevant keywords ready before you start your campaign. There are two categories of keywords – brand and category.

(a) Brand Keywords: It is for customers who are searching for your brand. Adding such keywords in your campaign will make it easy for them to find your ad in Amazon search results. These keywords will have a high conversion rate, and they will also help you maintain your position on the digital shelf. One disadvantage of brand keywords is that they might have a low volume, which can mean low impressions. Example: August is a beverage company that sells energy drinks. To appear for their brand, they target keywords like “August Energy Drink,” “August Sports Drink” etc.
(b) Category Keywords: Category keywords help the seller reach the customers who are searching for general products that are similar to their product. In category keywords, you get a larger volume of searches, more impressions, and more sales. But there are chances of high ACOS and low ROAS. Example: August wants to appear for searches that are not necessarily related to their brand. So they bid on keywords like “sports drink,” “fitness drink,” and “energy drink.”
We recommend using a mix of product, category, and keyword targeting for maximum searchability, visibility, and detail page coverage. Sellers can use the keyword and product targeting in the same campaign but not in the same ad group. Vendors can only use one targeting type per campaign.
Step #6 Setting the Bid – The Straightforward Approach:
The next thing you do is to set a bid for your keywords. A bid is the maximum amount you are willing to spend on a click. You can always scale your bids at a later time. Depending on the keywords and keyword match type, you have to bid differently. With increasing competition, the bid also increases.
Setting Bids by Match Type:

Setting Bids by Keywords:

The more restrictive your keyword or match type is, the higher you bid on it. You can set bids for your automatic campaign at $0.35. For broad match and brand keywords, you can increase the bid by approximately 40 to 50 percent, which is $0.60. For phrase and category keywords, you can set the bids about 20 to 25 percent higher than broad and brand keywords, which is $0.75. For the most restricted and less competitive category, the bid will be 35 percent higher than phrase and category keywords, which is $1.00.
(a) Bidding Strategies for Sponsored Product Ads:
In an automatic campaign, you set bids for the whole campaign, and in manual campaigns, you can set bid on individual keywords. Sellers can choose from three bidding strategies and determine which one works best for their campaign.

Dynamic Bid – Down Only: Amazon will decrease the bid in real time if your ad is less likely to convert into a sale. Amazon may decrease the bid by 100%.
Dynamic Bid – Up and Down: Amazon adjusts your bid in real if your ad is more likely to convert and it will lower the bid if your ad is less likely to convert to a sale.
Fixed Bid (The traditional method): Amazon will use the exact for all opportunities. You will get more impressions compared to dynamic bidding, but the chances of conversion will decrease.
Adjusting bids by placement:
In addition to creating a bidding strategy, you can differentiate bids by placement. Placement means the places across Amazon where your ad can appear. Sellers can adjust the bid by placement to increase the visibility of an ad for a specific placement. You can enter a percentage increase (up to 900%) to your base bids for the two placements – the top of the search page and product pages. By doing this, your bid will be increased by a specific amount when your ad competes for an opportunity on those placements. Your base bid will apply to the “rest of the search.”

At present, there are three placement groups:
The top of the search – your ad will appear at the top row on the first page of search results.
Rest of the Search – your ad will appear in the middle or at the bottom of the search result. It also appears on the second page and beyond.
Product Page – your ad will appear on the product detail page and other off search results like the add-to-cart page.
How it works:
Suppose you are advertising a watch and your bid is $1.00 for a sports watch. You set a 50% and 25% adjustment for ‘top of search (first page)’ and ‘product pages.’ This is how your bids will be applied:
(b) Bidding Strategy for Sponsored Brand Ads:
Sponsored Brands has a feature called automated bidding where Amazon automatically adjusts the bid across all the placements. For instance, automated bidding will lower the bidding for placements below the top search. Automated bidding will never increase the bids. Sellers can also choose custom bidding to increase or decrease the bid for other placements. This adjustment will be used for placement below the top of the search.
Step #7: Set Up & Manage the Campaigns – Time to Go Live
You can either create a campaign manually or by bulk operation. Bulk operation also allows you to manage, edit, and optimize the campaign from time to time. You can use the bulk operation to do the following:
Pausing the campaign
Changing the end date
Updating the daily budget
Adding new products in a campaign
Adding new keywords in a campaign
Pausing existing keywords
Scaling the keyword bids

Things To Remember:
Advertise products based on objective (increase visibility or brand awareness) and based on that choose your advertising type (Sponsored Products or Sponsored Brands)
Start with an automatic campaign and then move to manual campaigns
Run both automatic and manual campaigns to stay updated on the trend of keywords
Conduct proper keyword research before starting campaigns
Target by keywords and products
Save time by managing a campaign with bulk upload
Don’t just sit and watch – try new strategies every day
That’s all folks. Setting up the campaigns the right way will prevent you from any headaches of redoing them in the future. Now that you have built a robust frame for your advertising campaigns let them run and increase your sales. But remember they are not a set-it-and-forget-it thing. You need to continuously optimize them at a micro level to make sure you are receiving the right amount of visibility and traffic on your product detail page. If you need any help with Amazon PPC management, contact us.
Wait For The Next Part:
In episode five, we will learn how to optimize your ads through ad reports, and you can measure and improve campaign performance as well as identify growth opportunities.
Amazon Sponsored Ads Series: Episode 4
So far in the previous two episodes of the Amazon Sponsored Ad series, you have learned about the sponsored ad types and the targeting method available. Now we are all set to create campaigns. But it’s not just about throwing products into the campaigns, hoping that it will run. Poorly constructed campaigns can cause increased ACOS and negative conversion rates. Think of Amazon PPC campaigns as a building, creating a campaign will be the foundation, and it should be very strong so you can continue building. We have created this step-by-step guide which will help you build the most effective and optimized campaigns.
Step #1: Deciding the Campaign Objective – Why Are You Running This Campaign?
This is the first and most crucial step. Before setting up a campaign, you must be mindful of what is the objective. Your campaign objective will impact many of the decisions you make while setting up the campaign. Most of the advertisers run Sponsored Ads for:
(a) Campaign Efficiency:
Campaign efficiency is measured by ACOS and ROAS.

Advertising Cost Of Sales (ACOS) is the total amount spent on the campaign divided by total sales. The lower the ACOS, the more efficient your campaign is. Low ACOS indicates that the sales are high, and the advertising cost (spend) is low. So, you are getting more profits.
Return On Advertising Spend (ROAS) is the total sales of your campaign divided by what you have spent on advertising. ROAS is the opposite of ACOS. So, the higher the ROAS, the more efficient your campaign is.
(b) Brand Awareness:

Brand awareness is measured by impressions. Impressions mean how many times your ad is shown to shoppers.
Step #2: Selecting ASINs to Advertise – Best Performing and Potentially Strong
Choosing the right ASINs will increase your chances of reaching the campaign goal. You can select the ASINs based on their performance as well as your campaign objective.
(a) Choosing ASINs Based On Performance:
Regardless of your campaign objective, choose the ASINs that are already high-selling. By capitalizing on the best-selling products, you are maintaining relevancy with CTR and sales. As you will get more impressions, clicks, and eventually sales, you will be successful in defending your digital shelf while you prepare to advertise other strong and low-performing ASINs. Along with best-selling ASINs, start to advertise on the strong ASINs. Review your whole product catalog and choose the products that pass the retail readiness checklist. Don’t know what that is? Click on the link below to get all the information.
Advertising on these ASINs will help you to increase brand awareness and sales across the whole line of products.
(b) Choosing ASINs Based On Campaign Objective:
If your objective is to improve campaign efficiency (measured by ACOS and ROAS), you should avoid advertising any products that have low sales or that do not meet the retail readiness guidelines. These ASINs will just increase your spending, ACOS, and will not contribute towards improving your campaign efficiency. However, if your campaign objective is to drive brand awareness (measured by impressions), then consider advertising products that have low sales or products that are recently launched.
Tip: Do not choose any ASINs which are not retail-ready.
Step #3: Selecting the Sponsored Ad Types – Increase Visibility or Traffic
In episode 2 of the Amazon Sponsored Ad series, we discussed the types of Sponsored Advertising Amazon offers. Sellers can choose either of both. The question is when to choose which.
It is recommended that your advertising campaigns contain a mix of both to ensure that you get the most from your product offerings. But depending on the product, you are advertising and the objective, sellers can choose any of them.

(a) Sponsored Products – Increase Visibility
The main objective of a sponsored product ad is to increase visibility. These ads have highly visible placement across the search result pages as well as product detail pages. The best part is that they appear along with the organic results and sometimes even above the organic results. Advertisers can use these ads to promote the listing to shoppers who are searching for a product similar to theirs. Sponsored product ads are simple to set up, they do not require any images or copy, and they go live within an hour. This means that you can start getting impressions within an hour.
(b) Sponsored Brands – Increase Brand Awareness (Brand Registry required)
Sponsored Brand Ads work great for increasing brand awareness and impression for a brand’s entire product catalog or a new line of products. These ads stretch across the top of the product detail page, and the landing page of the ad can be your product detail page or your brand store. Because they drive traffic to your brand store, they create an immersive and engaging shopping experience for the customers. Sellers need to create an engaging headline and will have to choose the image that will be displayed on the left side of the ad. Using the brand logo will be effective for brand building, and it will motivate customers to click on the ad.
Step #4: Set the Budget & Duration – Financial Thresholds
The next step is to decide on the budget. Setting a budget will help you to keep a check on your advertising dollars. Advertisers can control spend by setting a daily budget and if they are using Sponsored Brand ads, a campaign budget.
(a) Daily Budget: It means the maximum amount you are willing to spend per day over a calendar month. When your daily budget runs out, your campaign will pause automatically. It’s essential to set an adequate budget so your campaign can run throughout the day. You can increase or decrease the budget anytime. Example: An advertiser has a campaign for its best-selling products. To ensure that their ads run daily and throughout the day, they use daily budgets.
(b) Campaign Budget (Sponsored Brands Only): It means the maximum amount you are willing to spend for an entire campaign. Your campaign will continue to run until the budget is consumed or the campaign expires. The campaign budget applies to Sponsored Brand Ads only. When using the campaign budget, sellers should only select an end date. After they have chosen the campaign budget, they can either increase or decrease it.
Example: An advertiser is running a Black Friday campaign, and they have a limited budget. They use a campaign budget to make sure they do not spend more than their goal.
Also, depending on your campaign objective, you can decide the duration of your campaign. You can either run your campaign continuously or seasonally for a limited time.

(a) Run Campaign Continuously: If you want to run the campaigns year-round and don’t want to miss out on any impressions or sales, then you should not enter an end date. Example: An advertiser is running a campaign for its best-selling products. He does not want to miss out on any chances of getting sales, so he decides to run the campaign continuously all year round.
(b) Select An End Date: Selecting an end date can prove to be effective when you are running seasonal campaigns or campaigns for some upcoming holidays and festivals, or you are advertising products with limited availability. When the end date has passed, your campaign will automatically expire. You can extend the end date any time before the campaign expires. If the campaign expires and you still want to run it, you can copy it and start a new campaign.
Example: An Advertiser is running a campaign for Prime Day. He launches the campaign a few days before Prime Day and chooses an end date at the end of the Prime Day.
Step #5: Adding Keywords And Targeting Products And Category – Reach The Right Audience:
Based on the type of advertising, you can choose the targeting methods. Sellers can either target by keywords, products, or categories (Category and product targeting are only available for Sponsored Products and not for Sponsored Ads). If you choose to target by keywords, there are various strategies to consider. It’s very essential to have your keyword list, and it is equally important to consider how shoppers search for a product (customer search terms) because the customer may search on Amazon using different search terms that you are not even aware of. So it’s best to have a range of relevant keywords ready before you start your campaign. There are two categories of keywords – brand and category.

(a) Brand Keywords: It is for customers who are searching for your brand. Adding such keywords in your campaign will make it easy for them to find your ad in Amazon search results. These keywords will have a high conversion rate, and they will also help you maintain your position on the digital shelf. One disadvantage of brand keywords is that they might have a low volume, which can mean low impressions. Example: August is a beverage company that sells energy drinks. To appear for their brand, they target keywords like “August Energy Drink,” “August Sports Drink” etc.
(b) Category Keywords: Category keywords help the seller reach the customers who are searching for general products that are similar to their product. In category keywords, you get a larger volume of searches, more impressions, and more sales. But there are chances of high ACOS and low ROAS. Example: August wants to appear for searches that are not necessarily related to their brand. So they bid on keywords like “sports drink,” “fitness drink,” and “energy drink.”
We recommend using a mix of product, category, and keyword targeting for maximum searchability, visibility, and detail page coverage. Sellers can use the keyword and product targeting in the same campaign but not in the same ad group. Vendors can only use one targeting type per campaign.
Step #6 Setting the Bid – The Straightforward Approach:
The next thing you do is to set a bid for your keywords. A bid is the maximum amount you are willing to spend on a click. You can always scale your bids at a later time. Depending on the keywords and keyword match type, you have to bid differently. With increasing competition, the bid also increases.
Setting Bids by Match Type:

Setting Bids by Keywords:

The more restrictive your keyword or match type is, the higher you bid on it. You can set bids for your automatic campaign at $0.35. For broad match and brand keywords, you can increase the bid by approximately 40 to 50 percent, which is $0.60. For phrase and category keywords, you can set the bids about 20 to 25 percent higher than broad and brand keywords, which is $0.75. For the most restricted and less competitive category, the bid will be 35 percent higher than phrase and category keywords, which is $1.00.
(a) Bidding Strategies for Sponsored Product Ads:
In an automatic campaign, you set bids for the whole campaign, and in manual campaigns, you can set bid on individual keywords. Sellers can choose from three bidding strategies and determine which one works best for their campaign.

Dynamic Bid – Down Only: Amazon will decrease the bid in real time if your ad is less likely to convert into a sale. Amazon may decrease the bid by 100%.
Dynamic Bid – Up and Down: Amazon adjusts your bid in real if your ad is more likely to convert and it will lower the bid if your ad is less likely to convert to a sale.
Fixed Bid (The traditional method): Amazon will use the exact for all opportunities. You will get more impressions compared to dynamic bidding, but the chances of conversion will decrease.
Adjusting bids by placement:
In addition to creating a bidding strategy, you can differentiate bids by placement. Placement means the places across Amazon where your ad can appear. Sellers can adjust the bid by placement to increase the visibility of an ad for a specific placement. You can enter a percentage increase (up to 900%) to your base bids for the two placements – the top of the search page and product pages. By doing this, your bid will be increased by a specific amount when your ad competes for an opportunity on those placements. Your base bid will apply to the “rest of the search.”

At present, there are three placement groups:
The top of the search – your ad will appear at the top row on the first page of search results.
Rest of the Search – your ad will appear in the middle or at the bottom of the search result. It also appears on the second page and beyond.
Product Page – your ad will appear on the product detail page and other off search results like the add-to-cart page.
How it works:
Suppose you are advertising a watch and your bid is $1.00 for a sports watch. You set a 50% and 25% adjustment for ‘top of search (first page)’ and ‘product pages.’ This is how your bids will be applied:
(b) Bidding Strategy for Sponsored Brand Ads:
Sponsored Brands has a feature called automated bidding where Amazon automatically adjusts the bid across all the placements. For instance, automated bidding will lower the bidding for placements below the top search. Automated bidding will never increase the bids. Sellers can also choose custom bidding to increase or decrease the bid for other placements. This adjustment will be used for placement below the top of the search.
Step #7: Set Up & Manage the Campaigns – Time to Go Live
You can either create a campaign manually or by bulk operation. Bulk operation also allows you to manage, edit, and optimize the campaign from time to time. You can use the bulk operation to do the following:
Pausing the campaign
Changing the end date
Updating the daily budget
Adding new products in a campaign
Adding new keywords in a campaign
Pausing existing keywords
Scaling the keyword bids

Things To Remember:
Advertise products based on objective (increase visibility or brand awareness) and based on that choose your advertising type (Sponsored Products or Sponsored Brands)
Start with an automatic campaign and then move to manual campaigns
Run both automatic and manual campaigns to stay updated on the trend of keywords
Conduct proper keyword research before starting campaigns
Target by keywords and products
Save time by managing a campaign with bulk upload
Don’t just sit and watch – try new strategies every day
That’s all folks. Setting up the campaigns the right way will prevent you from any headaches of redoing them in the future. Now that you have built a robust frame for your advertising campaigns let them run and increase your sales. But remember they are not a set-it-and-forget-it thing. You need to continuously optimize them at a micro level to make sure you are receiving the right amount of visibility and traffic on your product detail page. If you need any help with Amazon PPC management, contact us.
Wait For The Next Part:
In episode five, we will learn how to optimize your ads through ad reports, and you can measure and improve campaign performance as well as identify growth opportunities.


